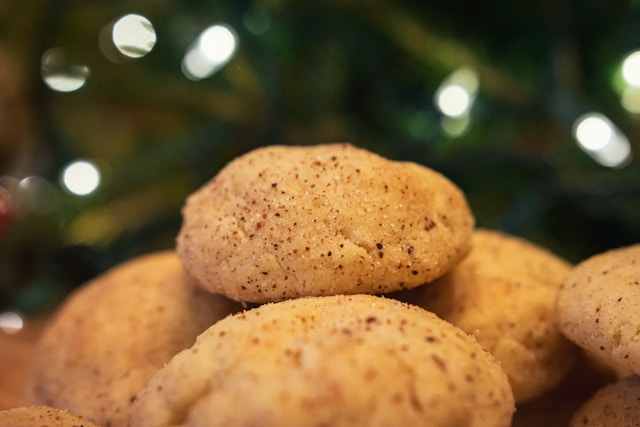
I’m sharing her baking secret, plus her foolproof recipe: These snickerdoodles practically fly off the dessert spread at every party I bring them to!
If you were to take a peek inside my Mom’s recipe box, it would only take you one guess to figure out her favorite type of recipe. The main dish, salad, soup, and breakfast sections are slivers compared to the approximately 75 percent of the stack that makes up her favorite category: desserts.
I’m 37 years old and have lived on my own for nearly two decades, but the scent of cinnamon rolls, coffee cake, bran muffins, and snickerdoodle cookies wafting from the oven still takes me right back to her kitchen, where we’d bake batches of all of these treats (and more!) together.
By now, I’ve made so many batches of her snickerdoodles that I’ve memorized the recipe: Whether it’s on the request of a friend, for a potluck party for which I’m assigned dessert, or simply because I’m craving a taste of home, this recipe lives full-time in my head. (But don’t worry, I won’t leave you hanging! I jotted it down and am sharing it below.)
Mom’s handwritten recipe, which she got from her mom, who probably jotted it down from an old red plaid cookbook, is surprisingly similar to BHG’s timeless Snickerdoodles. Fans deem those “the best” and reveal that they’ve even won a blue ribbon at the county fair. But even if the best possible recipe, it’s still all too easy to over-bake your cookies.
Mom’s No. 1 Trick For Perfectly Baked Snickerdoodles
As for Mom’s rendition, it originally trailed off after “Bake at 400°”; no time listed and no further instructions given. Thankfully, true to her profession as a teacher, Mom got out her red pen and corrected the recipe—and verbally coached me—that you’ll bake them for about 8 to 10 minutes, or until they’re set around the outside, puffy (and perhaps a hint underbaked) in the center, just barely starting to turn golden, and (most importantly) making a crackling sound.
“As long as they’re making faint crackling noises, they should be good to pull from the oven,” I recall her telling me. “The residual heat will cook them a tiny bit more and you'll end up with just-right cookies.”
With other baked goods like chocolate chip cookies, sugar cookies, and gingersnaps, I use tried-and-true methods for how to test for cookie doneness, which are all approved by our Test Kitchen. But to this day, I swear by Mom’s auditory option for snickerdoodles. It has yet to lead me astray, so why mess with success?
Still, now that the talented Test Kitchen is just steps away, I couldn’t resist running Mom’s cookie hack by Sarah Brekke, M.S., Better Homes & Gardens Test Kitchen brand manager, to see if her baking trick was sound.
“The listening trick sure reminds me of a former BHG magazine food editor. She offered that tip to us in regards to cakes,” Brekke tells me. “I giggled the first time I heard this suggestion, but some people swear by it. Even Lynn Blanchard, who has managed the Test Kitchen since 1999] uses that strategy from time to time.”
Other baking experts across the internet, including one contestant on The Great British Bake Off, also swear by the sizzle trick for cakes. They claim that the toothpick test is the most reliable way to test if a cake is done, but tapping into other senses can help if you’re feeling uncertain. As for the crackling sound, it’s a sign that there’s still moisture left in the baked good that’s creating steam. A silent bake will likely end up dry and overbaked; a too-loud sizzle means that more baking time is required.
Still, there’s little science to prove that a crackling sound is a surefire way to tell that your snickerdoodles are done.
“From the Test Kitchen perspective, we like cookie doneness indicators that are a bit more concrete in terms of colors and textures,” Brekke says, pointing to the recommendations in our primer as your surest strategies. Instead of (just) listening for that crackling, look for:
- Golden bottoms
- Golden, firm edges
- A top that’s no longer shiny
That being said, Brekke says that it’s just fine to listen just like Mama always said as long as you do so in tandem with another cue, too, just in case.
Thanks for the trick, Mom … and for the memories and the recipe. And with that, here it is: Our, and hopefully now your, favorite snickerdoodle cookie recipe.
Mom’s Snickerdoodles
Yield: About 18 cookies
Ingredients
- 1 ¼ cups all-purpose flour
- 1 teaspoons cream of tartar
- ½ teaspoon baking soda
- ¼ teaspoon kosher salt
- 1 stick (½ cup) unsalted butter, at room temperature
- ¾ cups granulated sugar
- ¼ teaspoon vanilla extract
- 1 large egg, at room temperature
- 2 tablespoons granulated sugar
- ¾ tablespoon ground cinnamon
Directions
- In a large bowl, sift or whisk flour, cream of tartar, baking soda, and salt together. Set aside.
- In a separate large bowl, using a handheld mixer on medium speed, beat the butter, sugar, and vanilla together until light and fluffy; about 3 to 4 minutes. (Or, use a stand mixer fitted with the paddle attachment). Reduce speed to low. Add the egg and beat well.
- Scrape the sides and bottom of the bowl then add the flour mixture in three parts, mixing just until it disappears and blends in evenly.
- Wrap the cookie dough in plastic wrap and chill it for at least 30 minutes or for up to 3 days.
- Heat the oven to 400°. In a small bowl, combine the 2 tablespoons of sugar and ¾ teaspoon of cinnamon.
- Form cookie dough into 1 ½-tablespoon balls (or use a medium cookie scoop), then roll each in the cinnamon-sugar mixture to coat completely.
- Place the cookie dough balls on an ungreased cookie sheet, leaving at least 2 inches of space between each dough ball and the next.
- Bake for 8 to 10 minutes, or until the edges are golden (and you hear a faint sizzle). Allow the cookies to rest on the pan for 10 minutes, then transfer them to a wire rack to cool completely.
This article was written by Karla Walsh from Better Homes and Gardens and was legally licensed through the DiveMarketplace by Industry Dive. Please direct all licensing questions to legal@industrydive.com.


