Make a rich, cooked-from-scratch broth using your stovetop, slow cooker, or multi-cooker – and minimal hands-on time – with these Test Kitchen tips.
Once you know how to make broth (in its many forms), this pantry staple can be sipped plain as a nourishing pick-me-up, used as a base for making delicious soups, or added moisture and flavor to all sorts of savory dishes.
But what is broth, anyway? Broth, stock, and bouillon are all terms used for a rich liquid made by simmering poultry, meat, and/or vegetables in water and seasonings. You can purchase broth in cartons, cans, or cubes, but our Test Kitchen relies on making homemade broth to control what goes into a dish – especially the sodium count. Read on to learn a few basic steps on how to make broth so you can create chicken broth, beef broth, and bone broth for all your recipes.
How to Make Broth from Beef or Chicken
Chicken broth, beef broth, vegetable broth, bone broth – there are many different types of broth. We have specific guides and recipes for each of these, but use the following steps as a general guide to how to make broth at home.
Step 1: Choose Your Meat and Get Your Stockpot Ready
Poultry and beef broth are the two most common types of broth used in recipes. Bones contribute rich flavor to the homemade broth; choose about 3 pounds of meaty bones (leftovers work great for this!), such as roast chicken or turkey, beef roast, and T-bone steaks. Use a tall, heavy stockpot, just wide enough to hold the pieces. It should also have a lid.
Types of Meat for Homemade Broth
- You can use a whole chicken, but bony pieces like wings, backs, and necks are ideal because most of the flavor comes from the bones.
- For meatier broth, opt for bone-in dark meat pieces, such as thighs or legs, over bone-in breasts. They're more flavorful and usually cheaper, and the meat doesn't dry out as quickly.
- For beef, opt for shank crosscuts, short ribs, or arm bones.
Test Kitchen tip
Don't remove the skin from the chicken pieces because it adds flavor to the broth. You will skim the fat from the broth later. If using chicken wings, cut each wing at the joints into three pieces. This exposes more bone, resulting in a broth with a richer flavor.
Step 2: Add Vegetables and Aromatics
To the pot, add cut-up vegetables, such as celery (with leaves), carrots, and unpeeled onion, as well as seasonings, such as salt, dried thyme, peppercorns, fresh parsley, bay leaves, and unpeeled garlic clove halves. All of these add flavor to the broth. For the herbs, swap dried sage or basil for the thyme, or use a combination. To use fresh thyme or sage instead of dried, add two to three sprigs along with the other seasonings.
Test Kitchen tip
If you make broth regularly, keep a container of leftover carrot peels and pieces, celery leaves, and onion skins in the refrigerator or freezer to flavor the broth. Vegetables and trimmings should still be fresh but don't have to be in pristine condition.
Step 3: Add Water and Simmer
Add 6 cups cold water to the pot. Bring the mixture to boiling and reduce the heat. Simmer, covered, for 2½ hours. It is essential to simmer, not boil, the broth. This low-and-slow cooking style allows the flavors to develop. Once the broth is done simmering, remove the meat and set aside to cool.
Test Kitchen tip
You may choose to remove the chicken from the broth as soon as it is tender. To do this, carefully remove the chicken pieces as soon as they're no longer pink. Cool slightly and remove the meat from the bones. Return the bones to the stockpot and continue to cook for the remaining cooking time. Set the chicken aside to cool and use it however you want.
Step 4: Strain the Broth
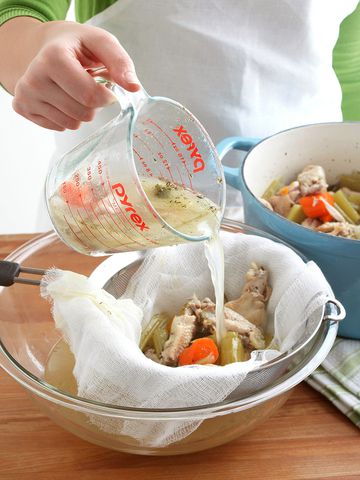
Strain the broth through two layers of 100% cotton cheesecloth layered in a colander or sieve set over a large bowl. Discard the vegetables and seasonings.
Test Kitchen tip
Taste the broth and adjust the seasonings if needed. For a more concentrated broth, return the broth to the pot and bring to boiling. Reduce heat and simmer, uncovered, until it reaches the desired flavor.
Step 5: Skim Fat from Broth
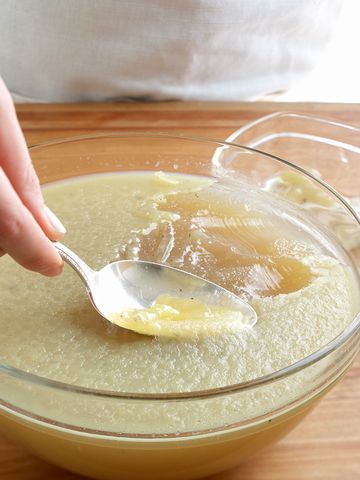
If using broth while hot, skim off the fat. To use a fat-separating pitcher, let the fat rise to the top, then pour the broth from the spout. Or use a spoon to skim away the fat floating on the surface.
Step 6: Store the Broth
Chill the broth about 6 hours, then lift off the fat layer with a spoon. Place the broth in a container. Cover and chill for up to 3 days or freeze for up to 6 months.
After the broth chills, it will take on a jelly-like appearance. This is from the collagen in the chicken bones. Once heated, the broth will become liquid again.
How to Make Broth from Vegetables
Our Test Kitchen's method for making stock from vegetables is just like the above steps, only adding a few more veggies, water, and aromatics. Simmer all the ingredients together for 2 hours, then strain. You can cover and chill the vegetable broth up to 3 days or freeze up to 6 months.
How to Make Broth in a Pressure Cooker
Cut down the time while still achieving a rich homemade broth by making it in your multicooker. For a deeper flavor, try sautéeing the meat a bit using the sauté setting before adding the veggies and water. Cook under high pressure for 1 hour. Be sure to allow the pressure to release naturally – a quick release might produce dangerous oily splatters from the release valve. See our beef broth recipe for specific measurements.
How to Make Broth in a Slow Cooker
Using the tips above, place the meaty pieces, veggies, and seasonings in a 4- to 6-quart slow cooker. Add water, cover, and cook on a low-heat setting for 10 to 12 hours or on a high-heat setting for 5 to 6 hours. Remove meat and set aside to cool. Strain, skim, and use or store the broth as directed above.
This article was written by Katlyn Moncada from Better Homes and Gardens and was legally licensed through the DiveMarketplace by Industry Dive. Please direct all licensing questions to legal@industrydive.com.


